I know I said
Part 2 would be about the
Stormlord/Stormsword variants, but before I get to that, I have some unfinished business from
Part 1. It seems I forgot a few things I had done to the turret of the
Baneblade.
First of all, I had forgotten I made the rear storage compartment removable. Here you can see it removed. (You can also see how I made the cupola able to rotate.) You can also see the two antennae that attach to the compartment. I had planned on making them removable, using magnets, but the magnets didn't hold firmly enough. Notice the brass pins, which give the needed security. (
Why removable, why not just glue them on? Two reasons, 1) Glued-on is begging to be broken off. 2) There is a location on the casement for an antenna, but its kit didn't come with one.)
Here you can see the brass registration pin that fits in the hole drilled above the lasgun (once you turn the compartment over, of course).
Here is the compartment almost slid into place. When all the way on, it is very sturdy, and looks glued on. (That's the reason I forgot I made it removable.) Also you can see the rectangular plate with the magnet, and the hole underneath. The base of the antenna has a recess that
captures that plate.
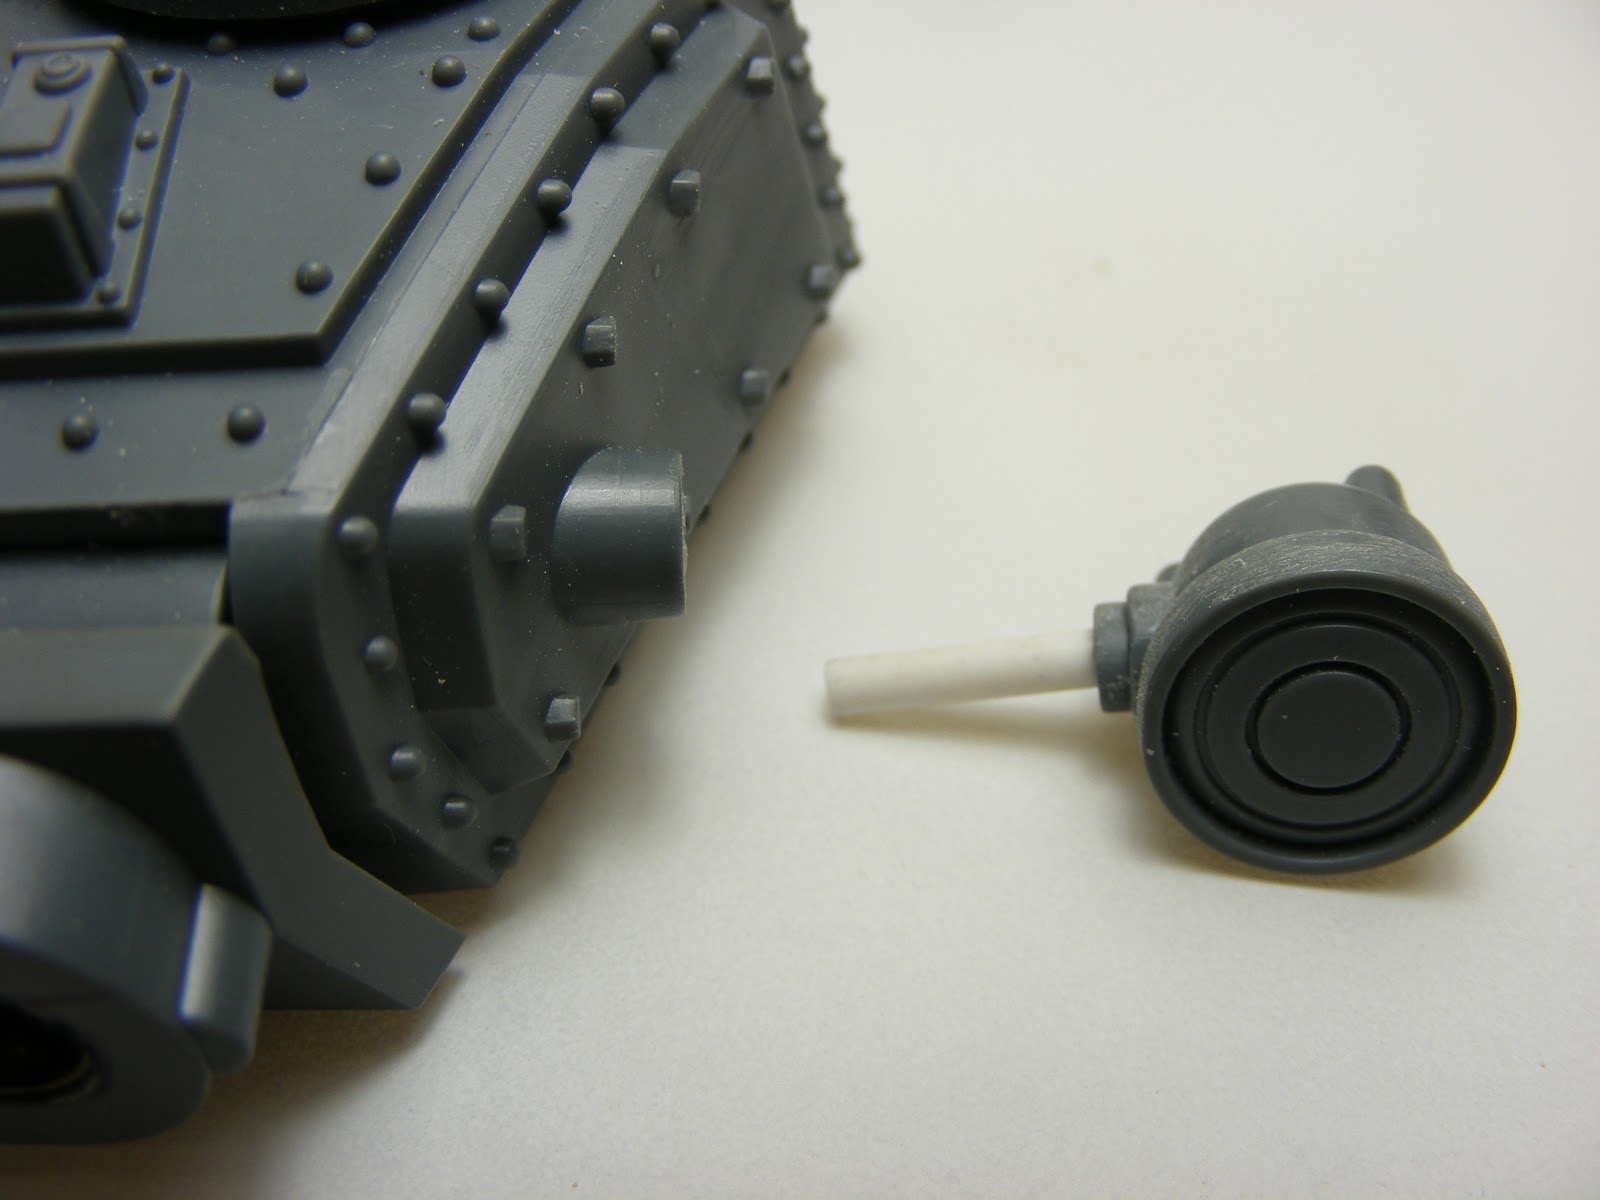
One last thing I did was to attach the searchlight. The nub on the light was smaller than the hole in the turret, so I knew it would make a weak joint. I filed it off, then drilled it out to fit a styrene tube. Then I drilled out the turret to fit the tube, as well.
A nice friction fit, with the advantage of the light swinging up and down.
The completed (except for painting) turret. A funny thing about the antennas, I usually make all the pieces interchangeable. Somehow one of the magnets flipped as I inserted it into its hole, so the antennas have reverse polarity. One only fits the right side, the other only the left. If you try to mix them, the antenna just jumps off.
OK, now we can go to Part 2.
Let's start with the casement. I drilled out the hinge, and inserted a pin, allowing it to open. I installed a magnet and drilled a hole to accept the antenna. This cupola is smaller, so the 'turret' commander will not fit. I had to remove most of this one's base to fit. I glued a disk with a magnet in the bottom of the cupola.
Here is the basic chassis arrangement for the
Stormlord. There is a front glacis and a rear platform. The glacis had four tabs on the sides to allow gluing to the side pods. Since it needs to be removable, I cut off the tabs, and used magnets to hold it in place. (See those magnets on the top lip of the glacis? They become important in just a minute.) There is also a cover for the rear to make it
more mechanical, I guess.
The kit comes with two stubbers that are very nice. They really don't lend themselves to temporary attachment though, and it took me a while to find this solution. It finally came when I noticed the treaded plate did not fit snugly between the two side pods. (Pay no attention to the magnets in the plate.) In fact, there was enough room for a .020" thick piece of styrene to fit one each side.
The tread plate sits on the lip of the rear platform and the styrene
I-beam (I told you to remember in Part 1). No magnets, just gravity. And friction. When the styrene walls attached to the stubber side walls are slid down in place, everything is nice and tight. I added pivot posts to the guns so they could swivel, but the ammo belts won't allow much play. If I were to do this again, I would spend a little more time so they would not only pivot more, but would swing up and down.
Here is the arrangement with the casement in the front position. Notice how the angled lip on the back of the casement
captures the fronts of the stubber side walls. They are quite secure. (Now you may notice in my pictures that pieces and parts seem to come and go.....the hatch cover, for instance. The order in which you see these pictures is not necessarily the order in which I worked. Also remember that all the parts are removable. I may not have put all the pieces back in place when I took a picture to highlight a particular part. Be assured I am working on a single model, not many.)
OK, remember those magnets I told you to wait a minute for, and the magnets I told you to pay no attention to? Well, here they are. What, you can't see them? OK, remember that tread plate at the rear? It is two sided, and it is the top plate you see here. It is held in place by the magnets, and the styrene strips glued to the inside of the side pods. (You can just see a part of a strip in this shot. You can see more in the earlier 'basic chassis' shot.
When the casement is in place in the rear position, it secures the rear of the top plate.
Alright, let's address attaching the weapons systems to the casement. There are two basic types, the Vulcan Mega-bolter, and various tube-launched ordinance. This was the hardest part of the project, as GW wants you to chose
either-or. For instance, if you followed instructions for adding the Vulcan (on the left), you would glue the notched top plate above the opening in the front of the casement. Simply doing that would not let the tube base fit at all. Plus, as is, the only way to install the side panels that hold the Vulcan is to glue them to the casement. That is not acceptable to me, so I cut a piece of styrene to fit the back of the opening, and installed two magnets in the styrene and two in the casement. I glued the styrene to the top plate, and added some other pieces to make the Vulcan a self-supporting sub-assembly. It slides in snugly, and is quite secure. You'd think the tube base would be a piece of cake, but it had its issues, too. The bottom of the opening and the back of it are not at 90º, so I had to add the white shim to make the back of the tube base sit flush with the back of the opening. Plus you can see the weight of the gun barrels required the addition of a third magnet.


I drilled out and installed new pivot pins, plus shims, to let the Vulcan raise and lower. (The shims to hold the gun attitude where you place it.
The basic gun barrel in place.
I guess there is going to be a Pt.2.5
Don


No comments:
Post a Comment